Home » Archive by category "News" (Page 3)

Creaflexx Flower Pendant

Designed by Kathleen Neumann

Materials:
3400021 Creaflexx Foil, 44.5 x 30 cm / 0.5 mm, Transparent
6832123 MS Multi-Surface – Metallic & Pearl Acrylic, Aquarium
2117154 Wax Glass Beads Luster, 6 mm,  Light Turquoise
2163691 Head Pins, 30 x 1.5 x 0.75 mm, Silver Coloured
9735402 Necklace Mechanism, 2 cm
9735291 Choker with Ball Clasp, ø 15 cm / 47 cm, ø 1.1 mm
1791058 Punch M Flower, 23 mm
1793058 Punch L Flower, 35 mm
1794058 Punch XL Flower, 47 mm
1827109 Awl, 9 cm
1802911 Soft-Cut Premium Line Scissors
1803901 Heat Gun
1823004 Modelling and Painting Sponge, ø 7 x 3 cm
9311433 Mixing Palette, 24 x 19 cm
1801810 Gimlet, 2.5 x 3 x 4 x 5 mm
1804003 Hot Glue Gun
1805001 Glue Sticks
1801908 Round Nosed Jewellery Pliers
1801905 Side Cutters
Paper offcut e.g: 1549901 My Colors Cardstock, Snowbound

Additional: Baking Paper, Thin Cotton Gloves, Heat Resistant Pad

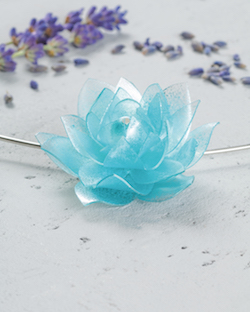
1. Cut a flower from scrap paper with each punch. These will serve as templates. Use a needle tool to transfer each flower onto transparent Creaflexx twice and cut out. Use a sponge to cover the Creaflexx flowers with a thin coat of blue pearlescent acrylic paint. Leave to dry.

2. Lay a sheet of baking parchment on top of a heat-resistant mat so that the Creaflexx won’t stick to the mat whilst warm. We also recommend you wear thin cotton gloves whilst working with Creaflexx as it may get very hot during the heating process.

Heat the flowers individually with a heat gun and bend the petals upwards. The smaller the flowers the more the petals should be bent. Transparent Creaflexx cools off very quickly, hardens and retains it’s shape. It can be repeatedly heated and petal positions altered.

3. Use a gimlet to make a hole in the centre of each flower except the largest. Thread a blue bead onto a headpin followed by the flowers (small to large except the largest). Always a place a dab of hot glue in the flower centres to stop them moving. After the last flower, remove the excess headpin with wire cutters and attach the largest flower with a dab of hot glue. Glue the necklace finding to the back of the flower. Temporarily unscrew the ball clasp and straighten the choker wire with jewellery pliers to thread the flower to the desired position. Re-bend the wire and attach the ball clasp.

Advantages: malleable when heated – hardens and retains shape once cool – reformable – can easily be cut with scissors – use any heat resistant surface as a former (e.g. cans, edge of a table, tubes etc.) – can also be embossed when warm.

See the Autumn/Winter Trends Catalogue for white and transparent Creaflexx.

Creaflexx Info:

Available in panels of … (size and thickness)

It is a thermoplastic resin. It can be shaped by heating – it solidifies again as soon as it is cold and then retains the form into which it was shaped. This process can be repeated. You can always reheat Creaflexx and bring it back to form into another shape.

It can also be embossed in the warm state, e.g. with a Spellbinders ™ Platinum ™

– Material can be cut with scissors

– It is recommended to work on a heat-resistant surface and place a layer of baking paper on top of it so that the Creaflexx can not stick to the surface when it is warm.

– Since the material can become very hot, we recommend wearing thin cotton gloves whilst working with Creaflexx.

– If one area is heated for too long, or if the material becomes too hot, the transparent Creaflexx may become milky white.

– The transparent Creaflexx has no adhesive side like the white Creaflexx.

– You always need adhesive to fix it, e.g. UHU Kraft all-purpose adhesive (remains milky after drying) or hot glue gun (clear, but you can still see the glue if the Creaflexx is not painted).

– It has two smooth non-adhesive sides.

In comparison to the white Creaflexx, the transparent Creaflexx must be warmed longer and it also cools and hardens faster.

– Creaflexx can be used, e.g. over table edges, metal cans or pipes. There should always be a layer of baking paper between Creaflexx and the substrate so that the material does not stick. The substate which is to be used as a mold, should be heat-resistant.

– Creaflexx can be decorated with acrylic paint as desired.

– For better durability of the painted surface and a higher resistance to abrasion, it is recommended to finish the piece with a coat of varnish.

– Paints and varnish dry very slowly.

Holiday Memento Frame

If you’re not quite ready to say goodbye to summer you could try your hand at this Memento Frame (designed by Kathleen Hauck) which is created using one of Efco’s Pappart frames.


Tools:
1880420 Flat Synthetic Paintbrush, Gr. 20 / 19 mm
9311433 Mixing palette, 24 x 19 cm
1879900 Plastic Paintbrush Washing Container, 16 x 16 x H 8.5 cm
1804102 Hot Glue Gun, 55 W for ø 11.2 mm
1805005 Hot Glue Sticks

Materials:
2630692 Rectangle Frame, 21 x 30 x 8 cm
6000901 FolkArt Acrylic Paint, 59 ml, Wicker White
6000412 FolkArt Acrylic Paint, 59 ml, Magenta
2486101 Plastic Letter Beads, ø 6 mm, 200 Pieces, Multicolour
2486001 Plastic Number and Sign Beads, ø 6 mm, 30 g ~ 180 Pieces, Multicolour
2002702 Waxed Cotton Cord, ø 2 mm / 6 m, Cream
2604002 Medium Mixed Shells in a Basket, ø 19 cm
1402402 Wooden Clothes Pegs, 45 mm, 24 Pieces, Untreated

In addition: Holiday photos or postcards (here: 1532162/63/64/65 Punched Design Paper, Romantic Summer, A4, je 1 Sheet 170g/m²)

1. Prime the frame with white acrylic paint and leave to dry. Then paint everything except the inner frame with magenta. Leave to dry.

2. Select the letters etc from the letter and number beads you need to spell “HOLIDAY # SUMMER ♥︎ 2017”. Thread the cube beads onto the cotton cord in order and glue the beginning of the cord to the back of the frame. Wrap the cord around the top half of the frame making sure it’s not too loose. Position the cubes where you want. Always fix the cord on the back with a spot of glue to keep the tension and hold the cord in position, preventing it from getting damaged later.

Tip: Instead of “HOLIDAY # SUMMER ♥︎ 2017” you could also add the holiday destination e.g. “HAMBURG”. In addition, this framework allows for the possibility of recording various events e.g. a wedding anniversary, a special birthday, the last family celebration or birth – there’s no limit to the imagination.

3. Stick some shells to the bottom of the frame. Then use wooden pegs to attach holiday photos or postcards to the cotton cords.

You can see a variety of Pappart Frames in the new Autumn/Winter 2017 Trends Catalogue.

Christmas

Efco have added some new shapes to their range of Pappart Frames…


They can be decorated using acrylic paints and a host of other craft materials and be used as unique picture frames or ornaments for memorabilia.

The frames can be used in a variety of ways all year round but look especially stunning at Christmas when combined with Starshine foil…

Here’s a simple but very effective festive project inspired by ancient Chinese shadow box art and the art of German paper cutting.

Winter Wonderland
designed by Kathleen Neumann

2629797 House Frame, 17 x 19 x 5 cm
6832082 MS Multi-Surface Acrylic Satin, Beetle Black
1795082 Pointed Fir Tree Punch 3XL, 67 x 63 mm
1794082 Pointed Fir Tree Punch XL, 45 x 43 mm
1794260 Reindeer Punch XL, 46 x 37 mm
1549989 My Colors Cardstock, 12 x 12 Inch, Black Magic
1000402 Starshine Effect Film, 50 x 35 cm / 0.30 mm
1260189 Wool Cord, 5 mm, Black
1802532 Comfortline Hobby Scissors
1880420 Flat Paint Brush Synthetic Hair Gr. 20
9311433 Mixing Palette 24 x 19 cm
1802523 Comfortline Scalpel
1802830 Cutting Mat DIN A4
1802730 Aluminium Ruler
9362009 Double-sided Deko-tape, 9 mm x 10 m, transparent
2689910 Warm White Lights, Battery Operated, 70 cm, 10 LEDs
1879900 Paint Brush Washing Container, Plastic, 16 x 16 x H 8.5 cm
1804003 Hot Glue Gun
1805001 Hot Glue Sticks
Pencil, Batteries


Paint the house frame with black acrylic and leave to dry.


Place the house frame on the Starshine foil and trace the outline with a pencil. Cut the shape out using the scalpel, ruler and cutting mat. Use double-sided tape on the front edge of the house frame to stick the Starshine foil in position.


Punch different sized fir trees and reindeer from the sheet of black card. Stick these to the Starshine foil with more double-sided tape. Trim any parts of the shapes that protrude beyond the edge of the house frame.


Glue the string of lights to the back of the frame using the hot glue gun. Glue the wool cord around the front edge with the hot glue gun to conceal the double-sided tape which may show through the Starshine foil.


To view the range of new Pappart frames please see the new Autumn/Winter 2017 Trends Catalogue and for Efco’s entire Pappart range go to their Pappart and Wood Catalogue. Starshine foil may also be found in the current Trends Catalogue on Page N.56.


Heart Pillow

Designer: Michaela Koch

Tools:
1802913 Soft-Cut Premium Line Scissors, 21 cm
1802532 Comfortline Soft Grip Hobby Scissors

Materials:
4900200 Oaki Doki Uni Fabrics, 70 x 50 cm, Assorted
4900600 Oaki Doki Print Fabrics So Cute, 75 x 50 cm, Assorted
1480347 Glitter Iron On Transfer Sheet, Hot fix, 15 x 20 cm, Light Blue
1796286 Punch XXL, Retro Flower, 58 x 56 cm
1002000 Puffy Polyester Wool Stuffing for Filling and Decoration, 250 g, White

Additional: Template, Pencil, Needles, Sewing Machine, Sewing Thread, Baking Paper, Iron, Sewing Needles.

1. Transfer the half heart (template) to the Oaki Doki fabric without a seam allowance. A left and a right half are required for each of the two fabrics. Take one plain and one patterned half heart and place them together with the right sides facing inwards. Sew the two halves of the heart together down the middle. Repeat for the other two halves.

Tip: Lay the two fabrics on top of each other and place the paper half heart before cutting. Fix the paper half heart to the fabric with pins. When the fabric is cut two identical heart halves (one left and one right) are automatically created.

(2) Remove the film from the glitter transfer sheet and punch out a flower. Place the flower on the white heart half and fix it with the iron. (Position baking paper over the glitter sheet.)

(3) Place the hearts right sides together and secure them with pins. Then sew them together leaving a turning opening.

Trim the seams as much as possible especially at the curves. Cut the seam at the heart tip. Turn the fabric through the opening and fill well with the wool filling.

(4) Sew the opening together by hand with a concealed mattress stitch.

You can download the template from Efco’s German Website.

Check out the Textiles Catalogue for the range of Oaki Doaki fabrics and Hot Fix Transfer Sheets.

Dreamcatcher

Designed by Kathleen Hauck

Tools:
1802532 Comfortline Soft Grip Hobby Scissors
1802730 Aluminium Ruler, 30 cm
1804102 Hot Glue Gun, 55 W for ø 11.2 mm
1805005 Glue Sticks, 300 x 11.2 mm, Clear

Materials:
2213525 Wire Ring, ø 25 cm, White
2213535 Wire Ring, ø 35 cm, White
2002002 Alcantara Cord, Cream, 3 mm
3456832 Feathers Deco Ribbon with Fringe, 40 mm, Light Pink
3429001 Flower Embroidery Lace Ribbon, 22 mm, White
3429032 Flower Embroidery Lace Ribbon, 22 mm, Light Pink
1223832 Crochet Ribbon, 20 mm, Light Pink
1233033 Cotton Ribbon, Romance, 25 mm, Light Pink
1215132 Double Satin Ribbon, 3 mm, Light Pink
2002201 Cotton Waxed Cord, ø 1 mm, White
2004202 Cotton Waxed Cord, ~ 0.5 mm, Cream
1004301 Marabu Feathers, 100 – 120 mm, 2 g ~ 20 Stk, White
1023701 Indian Pearl Beads, Matt, ø 5.5 mm, transparent
1023777 Silver Lined Indian Pearl Beads, ø 5.5 mm, Lilac

1. Cut a 3.2 m piece of Alcantara cord. Glue one end to the small wire ring with the hot glue gun. Wrap it around the ring until there is about 7-8 cm of the ring left visible. Glue the end to the ring with the hot glue gun.

Cut approx. 5.4 m of Alcantara cord for the large ring. Glue one end to the large ring. Wrap the ring approx. 15-20 times. Then position the bare section of the small ring against the large ring and continue wrapping both rings, binding them together. When the bare section is covered return to wrapping just the large ring. Fix the end of the cord with more glue.

2. Cut pieces of the various ribbons. Wrap them around the rings, sticking them to the back. Remove any excess ribbon. Fill the gaps with satin ribbon or cotton cords, fixing them in position with glue.

3. Cut 4 40 cm pieces of white cotton cord. Tie each strand in the middle of the two ring bound section. Thread the cords with matt Indian beads. Tie knots in the thread to create irregular intervals between the beads.

Cut 3 40 cm of cream cotton cord. Tie these to the two rings in between the white cotton cords. Thread the silver lined pink Indian beads onto the cords. Tie knots to create irregular intervals between the beads.

Cut 4 40 cm pieces of double satin ribbons. Use a touch of hot glue to stick the middle of the ribbons to the rings in between the cords. Pull the ribbons straight and use scissors to cut the ribbons to make the ones at the sides shorter than those in the middle.

4. Cut a 1.2 m piece of double satin ribbon and fold it in half. Attach the ribbon either side of the two ring bound section to create the hanging strap. Use the hot glue gun to attach three feathers to the rings either side of the strap.

Check out the Ribbons/Napkins and Autumn/Winter 2017 Catalogues to view Efco’s range of ribbons.

Texture Mat Coasters

Designed by Kathleen Hauck

Materials:
1607602 Square Beer Mat, 9.3 x 9.3 cm x 1.5 mm, 100 Stk.
9500525 FolkloreTexture Mat, 90 x 90 mm
4510999 Stamp Mat, Black
4510910 Stamping Block for Texture mats
4512089 Stazon Ink Pad, Black
4512100 Stazon Stamp Cleaner
1988506 Pigment Liners, Black, 0.05/0.1/0.2/0.3/0.5/0.8 mm, 6 Stk.
1990312 Textile Marker, Fine Point, 1-2 mm, 12 Stk.
1965003 Spray Varnish Satin Matt, 300 ml, Clear

Additional: Kitchen Paper


1. First place the texture mat on the stamp block with the double-sided adhesive film. Ink up the texture mat and stamp it on the beer mat. Leave to dry for a minute. Use the pigment liners to continue the design to the edge of the coaster and, if necessary, fill in any parts of the image not printed properly.

2. Colour the design with the textile markers. Leave to dry. Spray the beet mats with clear matt varnish and leave to dry. Spray the back of the mats with clear varnish for protection and leave to dry.

Check out the Autumn/Winter Trends Catalogue for the Texture Mats and Textile Markers.

Fabric Covered Box

Designed by Michaela Koch

Tools:
1802730 Aluminium Ruler
1802911 Soft-Cut Premium Line Scissors
1880424 Flat Paintbrush Gr. 24
1880412 Flat Paintbrush Gr. 12
9311433 Mixing Palette
1879900 Paintbrush Water Container, Plastic
1804003 Hot Glue Gun
1805001 Glue Sticks

Materials:
2638012 Flat Round Box
6832016 Martha Steward Satin Acrylic – Surf
6832098 Martha Steward High Gloss Acylic – Marmalade
9586205 Transparent Craft Glue
4901400 Oaki Doki Printed Fabric, 70 x 50 cm
4900300 Oaki Doki Bias Binding, 3 m x 20 mm, Red
1402402 Wooden Clothes Pegs, 45 mm
1402720 Wooden Cupped Round Blank, 20 mm
1174497 Country Button
2002728 Waxed Cotton Cord, Red

1. Paint the inside of the box and lid light blue using the wide brush. Leave to dry. Paint the outside of the base orange and leave to dry.

2. Cut a piece of Oaki Doki fabric approximately 23 x 23 cm. Use the thin brush to cover the outside of the lid with transparent glue. Position the lid in the centre of the fabric. Stick the fabric to the lid, smoothing it out to the edges. Apply more transparent glue to the edge of the lid. Pull the fabric down over the edge of the lid. The tighter the fabric is, the less folds will appear around the rim. Fix the fabric with wooden pegs and leave to dry. Use scissors to cut the excess fabric.

3. Cut a 42 cm strip of bias binding. The bias binding is folded in the middle making it easier to fold it over the edge of the lid. Wrap it around the bottom edge of the lid (half on the outside, half on the inside) and stick it in position with transparent glue. Hold it in position with wooden pegs whilst it dries. Thread a piece of waxed cotton cord through the button and knot it. Glue the button to the centre of the box lid using the hot glue gun.

Check out the Catalogue page for the products needed to complete this project.

Cutlery Pouch

Cork Cutlery Pouch

Materials:
3370603 – Cork Leather, Stripes
1945040 – UHU Kraft Adhesive
1402404 – Wooden Clothes Pegs
4900100 – Oaki Doki Bias Binding Tape
9586205 – Transparent Craft Glue
2004228 – Waxed Cotton Cord
2523308 – Smyrna Needle

1. Cut a 45 x 10 cm piece of cork leather. Fold over 10 cm at one end and stick it with UHU Kraft glue. Use wooden pegs to hold it together whilst it dries.


2. Fold a piece of Oaki Doki bias binding tape over the opposite end. Apply a thin layer of transparent glue to the cork leather to stick the tape in position. Hold it there whilst it dries with wooden pegs. The Oaki Doki binding should be flush with the cork.

Tip: To ensure that the tape doesn’t fray over time make sure that the edges are firmly stuck.


3. Draw a heart on grid paper using crosses as a template for the cross stitch decoration. Place the pouch on the felt pad. Use masking tape to fix the template on top of the cork beneath the binding. Use the awl to pierce the corners of all the crosses. Remove the paper template and, if necessary, re-pierce the holes in the cork. Cut a 240 cm piece of waxed cotton cord and tie a knot in one end. Thread the smallest Smyrna needle with the cotton and pass the needle up from the back through the bottom left hole. Create little cross stitches until the heart is created. Tie the cord off at the back with another knot and trim the excess cord.

4. Apply a line of UHU glue down either side on the back of the cork leather (approx. 26cm long). Fold the leather in two, pressing the edges together. Hold it in place with clips until the glue has dried.

Beton Bag Planter

Beton Jute Bag

Materials:
9318701 Beton Hobby for Modelling, 1,5 kg
3423122 Jute sack with cord, 14 x 18 cm
9911005 Empty container 155 ml, ø 69 mm, h 65 mm
1260178 Wool Cord, brown, 5 mm


1. Remove the cord from the jute bag and turn it inside out. Wrap the beaker in clingfilm.

Weigh out 1 kg of modelling Beton and mix it thoroughly with 160 g of water until it forms a smooth concrete mass. Leave the mixture to rest for 2 minutes before using it to fill the jute bag. Make sure the bag is filled completely (including the corners) and that there are no air pockets. Push the wrapped beaker into the Beton and loosely tie a piece of wool cord around the sack just below the top of the Beton. Leave to dry for several hours (preferably 24 hours).

2. Discard the wool cord. Carefully remove the jute bag by using a scalpel to cut the seam open and peeling it off the Beton. Remove the beaker and peel away the cling film. Tie a piece of wool cord around the Beton bag to finish.

Check out the Spring/Summer 2017 Trends Catalogue for efco’s range of Beton products.

A corker of a bag!

Efco’s cork leather and fabric can easily be hand or machine sewn with a standard foot. They are available in 4 different designs: 1 dark – Marron and 3 light – Granulo, Mosaic and Stripes. The leather has a faux suede effect backing and is medium weight whilst the fabric (labelled ‘Tissue’ in the catalogue) has a woven fabric backing and is the heaviest weight.

The Marron cork leather sheet (45 x 35cm) along with some of Efco’s cork tapes is all you need to create a simple yet stylish small bag…

Quick and simple to create this would make an ideal workshop project for anyone running sewing classes. Instructions can be found on the Projects4Crafters.com blog page.

To view the full cork range please see the Basics Catalogue.