
The trade webshop at efco creative.com has now been updated to include all new products and a complete listing of the Trends catalogue for Winter 2021
The links open in a new tab and point to the efcocreative.com trade web shop
Efco creative emotionsEfco creative craft and hobby products |
The trade webshop at efco creative.com has now been updated to include all new products and a complete listing of the Trends catalogue for Winter 2021
The links open in a new tab and point to the efcocreative.com trade web shop

The trade webshop at efco creative.com has now been updated to include all new products and a complete listing of the Trends catalogue for Winter 2019
The links open in a new tab and point to the efcocreative.com trade web shop
 The trade webshop at efco creative.com has now been updated to include all new products and a complete listing of the Trends catalogue for Spring 2019
The links open in a new tab and point to the efcocreative.com trade web shop

Handbag First Aid Kit
Designed by Michaela Koch
 Tools:
1802913 – Soft-Cut Premium Line Scissors, 21 cm, black/blue
1802730 – Aluminium Ruler, 30 cm
Materials:
3370600 – Marron Cork Leather, 45 x 35 cm / 0.65mm
4900800 – Oaki Doki, Retro Print Fabrics, 75 x 50 cm, 54 pieces
9315322 – Fusible Interfacing, 100% polyamide, 45 x 33 cm, 3 pcs
9121305 – TEX-Fix Gemstone Glue, 50 ml / 50 g
2552201 – Velcro Dots, round / self-adhesive / assorted, 20 mm, 12 pcs, white
In addition: pencil, iron, baking paper, pins, sewing machine, sewing thread

1. Cut a 31.5 x 12 cm piece from the cork leather. Cut out the same sized piece from the fusible interfacing. Lay the rough side of the interfacing on the reverse of the cork leather and iron. Peel the backing paper from the interfacing, lay the fabric over the top and iron. Cut the fabric to size.

2. Cut a 6 x 12 cm and an 8 x 12 cm piece from the cork/fabric strip created in step 1. Lay the cork pieces on top of one another ie the remaining 17.5 cm length on the bottom with the 8 cm length (cork side up) next and the 6 cm length on top. Pin and then sew them together.

3. Stick the velcro dots on with some textile adhesive, press lightly and allow to dry. Once dry, fix by pressing with an iron.
Party season is still with us so these coasters might prove useful as they can be used as place settings as well as coasters…

Cloth Star Coaster
Designed by Kathleen Hauck
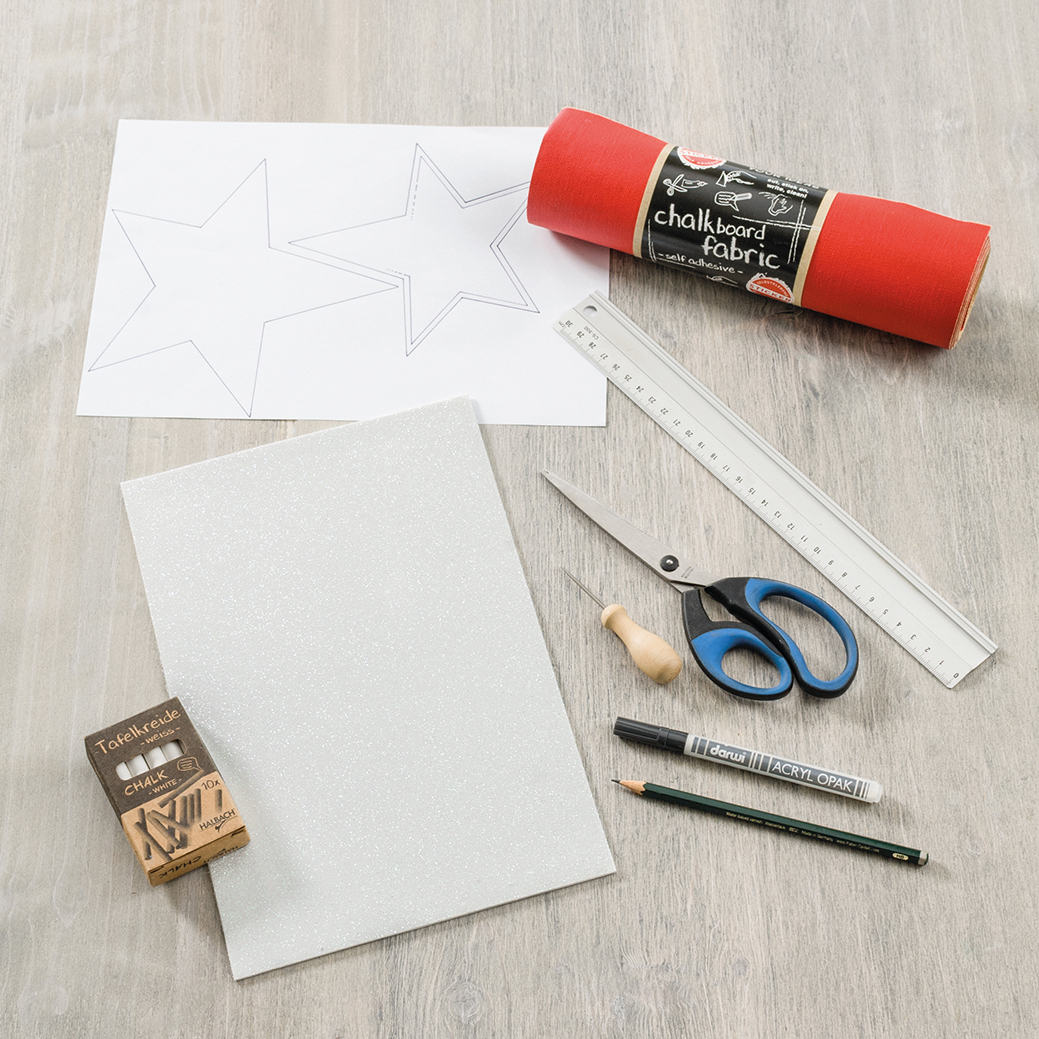
Tools:
1827109 Awl, 9 cm
1802913 Soft-Cut Premium Line Scissors, 21 cm, Black/Blue
1802730 Aluminium Ruler, 30 cm
Materials:
1054001 Glitter Foam Sheet, 200 x 300 x 2 mm, White
3464725 Red Chalkboard Fabric, Self-Adhesive, 25 cm x 2 m
1906010 Acryl opak Marker, Thin Point, 3 ml, White
3465100 Chalk, White, 10 sticks.
In addition: Template, Pencil

(1) Cut out the larger star from the template and transfer it onto the back of the Glitter foam rubber with the awl. Cut out the star.
Cut out the smaller star from the template and transfer it to the back of the chalkboard fabric with the pencil. Cut out the star.
Note: If the foam rubber star is cut out, please check once again whether the fabric star is transferred correctly. Otherwise, it may happen that the chalkboard star is reversed and does not fit on the foam star.

(2) Peel the backing from the back of the fabric and glue the red star in the centre of the white foam rubber star. Using the ruler and the white opaque marker start drawing another star parallel to the cut edge of the red star. (As per the small star on the template with the line petering out into dashes and dots.) Leave to dry. Then write down the guest’s name with blackboard chalk.
You can view and download the Star template here: Star Template
Note: The lines that were drawn with the opaque marker are waterproof after drying, so they can not be wiped away. The name, which was written in chalk, can be wiped off with a damp cloth and changed at any time.
You’ll find Efco’s range of chalkboard fabrics in the current Trends 2018 Catalogue.
If you’re planning a party for New Year’s Eve then these little wine glass charms might come in very handy…

Shrink Plastic Champagne Glass Charms
Designed by Kathleen Hauck
Tools:
1830081 Protective Tube Set for Pliers for Aluminium Wire, ø 3.2/4.8/6.4/6.4 mm x 10 cm, 4 parts
1801908 Jewellery Pliers, 12 cm
1801905 Wire Cutters, 11 cm
1802907 Craft Scissors round, 13 cm, Assorted Colours
1801800 Revolving Punch, 6 Holes, 20 cm
1802730 Aluminium Ruler, 30 cm 
1881606 Flat Paintbrush, Size 6 / 6.3 mm
9311433 Mixing Palette, 6 parts, 24 x 19 cm
1879900 Paintbrush Washing Container, Plastic, 16 x 16 x H 8.5 cm
Materials:
1051901 Shrink Plastic, Matt, 20 x 30 cm, 3 Stk., Transparent
4511274 Clear Stamps, Good Luck, A7, 74 x 105 mm, 11 parts
4510903 Acrylic Block with Recessed Grip, 76 x 100 x 15 mm
4510999 Stamping Mat, 21 x 14.5 cm x 5 mm, Black
4512089 Stazon Ink Pad, 6 x 9.5 cm, Black
4512100 Stazon Stamp Cleaner, 56 ml
1796016 XXL Oval Punch, 63 x 45 mm
1988624 Staedler Watercolour Pencils , 24 Stk.
9316903 Clear Varnish, Matt, 50 ml
2226061 Anodized Aluminium Wire, ø 2 mm, 5 m / ~ 42g, Light Green
In addition: Paper Towel, Baking Paper, Oven, Template

1. First position the desired clear stamp on the acrylic block. Ink up the stamp and then stamp on the smooth side of the shrink plastic. In this way different stamp on the shrink film. Allow to dry briefly.
Use the oval punch to punch the motifs out. Colour the motif on the rough, matt back with the watercolor pencils.

2. Make a hole in the ovals with the largest circle of revolving punch.
Place the shrink plastic with the coloured side up on baking paper and heat in an oven (preheated to 120°C) for about 2 to 3 minutes. Keep an eye on it whilst it shrinks. When shrinking in the oven, the shrink plastic bends first and then straightens again. Then it can be taken out and allowed to cool.
Paint the charms on the rough back with clear matt varnish, so that the watercolor pencils are fixed and can no longer rub off. Allow to dry briefly.
Tip: If the shrink plastic is slightly curved after shrinking, it can be gently flattened or slightly weighted immediately after removal from the oven.

3. Then cut a 35 cm piece of aluminum wire. Cut off 2 pieces of white protective tube and pull over the jewellery pliers. Use the jewellery pliers to bend the aluminum wire into a spiral at each end. (See template – You can view and download it here: Template.)
Curl another short piece of aluminum wire into a jump ring. Thread a shrink plastic charm onto this jump ring. Then close the jump ring and thread it so that the shrink plastic hangs between the rings. Wrap the aluminum wire around a champagne glass stalk and cross the rings in such a way that the shrink film charm hangs between the rings.

Efco have a range of festive Christmas themed Pappart available for decoration. It can be decorated in various ways with assorted paints and mediums. Here’s one idea for this cute Christmas Wight…

He’s been painted with acrylics using a dry brushing technique…
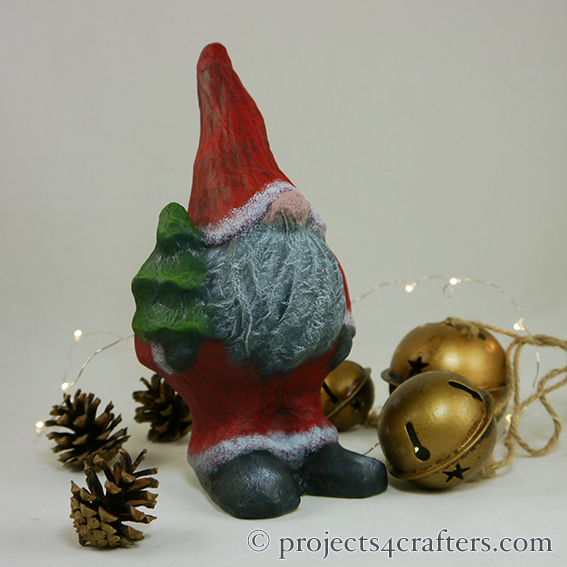
It’s a very simple but effective method to colour Pappart!
To see Efco’s full range of Pappart check out the Pappart/Wood Catalogue.
You’ll also find more in the Autumn/Winter Trends Catalogue.
Triangle Frame with Starshine Effect Foil

Designed by Kathleen Hauck
 Tools:
1802730 Aluminium Ruler, 30 cm
1802510 Soft-Cut Premium Knife inc. 2 blades, 9 mm
1802526 Comfortline Cutting Mat DIN A3
1802911 Soft-Cut Premium Line Scissors, 15 cm, black/blue
1880420 Flat Synthetic Paint brushes, Gr. 20 / 19 mm
9311433 Mixing Palette, 6 parts, 24 x 19 cm
1879900 Paintbrush Washing Container, plastic, 16 x 16 x H 8.5 cm
1823105 Plastic Spatula, 17 – 19 cm, 5 parts
1804101 Hot Glue Gun, 20 W, for ø 7.4 mm
Materials:
1790019 Punch S, Star, 15 mm
1791019 Punch M, Star, 24 x 23 mm
1793019 Punch L, Star, 35 mm
1549901 My Colors Cardstock, 30.6 x 30.6 cm, 216 g/m², Snowbound
2630698 Pointed Triangle Frame 15 x 30 x 7 cm
6000901 FolkArt Acrylic Paint, 59 ml, wicker white
9316002 Deko-Snow with Glitter effect, 150 g
1000402 Starshine Effect Foil, diffused translucent, 50 x 35 cm / 0.33 mm
1520606 Tacky Special Double-sided Tape, 6 mm x 10 m, transparent
2689111 LED Fairy Lights, warm white inc. Battery, 10 LEDs, white / copper wire
In addition: Pencil

1. Place the triangle frame on the textured side of the white paper and trace around the inner and outer frame with the pencil.
Use each star punch to punch one star out of the rest of the paper. These stars will serve as a template. Use the templates to draw any number of stars within the inner triangle, always some distance from each other and the inner frame.
Cut out the frame along the outer line and cut out the stars as well.
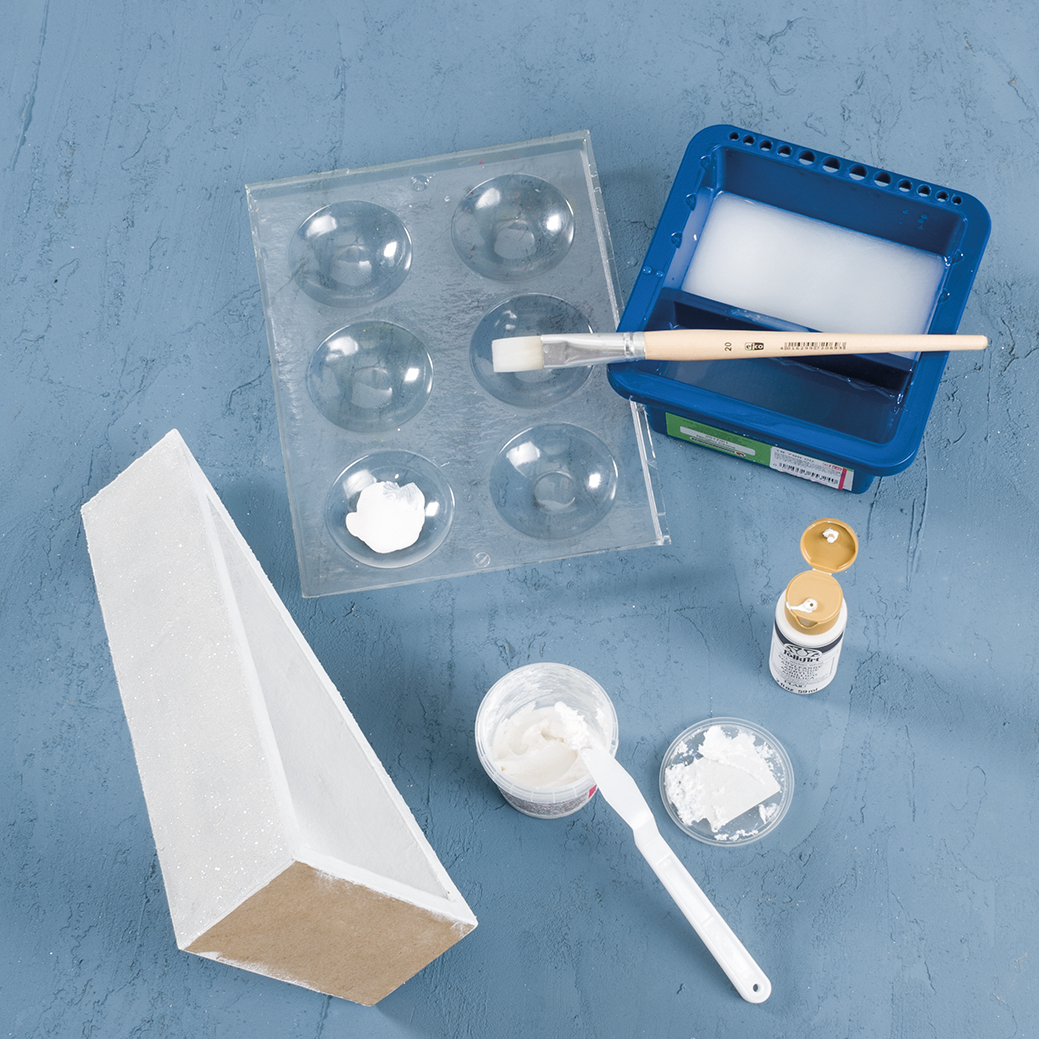
2. Prime the complete triangle frame with white acrylic paint and leave to dry. Then apply the Deko-Snow paste with a spatula to the outside edges of the frame. Leave to dry.

3. Stick double-sided tape around the edges of the paper triangle on the textured side. Stick the paper triangle to the Starshine sheet. Cut out the Starshine following the the edges of the paper triangle. Use double-sided tape around the edges of the Starshine triangle to stick it to the triangle frame. Glue the fairy lights inside the back of the triangle frame using the hot glue gun.
You’ll find the PappArt triangle frames and Starshine Effect Foil in the current Trends Autumn/Winter 2017 Catalogue and the Deko-Snow range is on page 630 in the Paints Section of the Main Catalogue.
To view Efco’s full range of Pappart including their large selection of Christmas themed items please see the PappArt Section.
Beton Star Advent Wreath

Designed by Kathleen Hauck

Tools:
1880420 Synthetic Flat Paintbrush Gr. 20
1879900 Paintbrush Washing Container, 16×16 x H 8.5 cm
1802730 Aluminium Ruler, 30 cm
1802911 Soft-Cut Premium Line Scissors, 15 cm, black/blue
1802200 Safety Glasses, 15.8 x 5 cm, clear
Materials:
1014905 Polystyrene Star, 50 mm, 6 Stk.
1014908 Polystyrene Star, 83 mm, 4 Stk.
1014911 Polystyrene Star, 115 mm, 2 Stk.
9317901 Easy Beton Paste, 350 g, grey
9317903 Easy Beton Paste, 350 g, cement grey
9500005 Star Mould, 3-parts
9319601 Beton Premium for Casting, 1.5 kg
In addition: 4 candles, aluminium foil, adhesive strips, protective gloves, protective mask, mixing container and old spoon/stick for mixing the Beton, scales

1. Paint any number of polystyrene stars with light and/or dark Easy Beton paste. Leave to dry.

2. Cut four 7cm wide strips of aluminium foil. Wrap a piece of foil around the bottom of a candle leaving about 1cm overhanging. Fix it with a piece of adhesive tape. Fold the excess foil around the bottom of the candle and fix in position with 2 pieces of tape, crossing each other underneath. Carefully remove the aluminium foil sleeve from the candle.
Repeat for the other three candles.
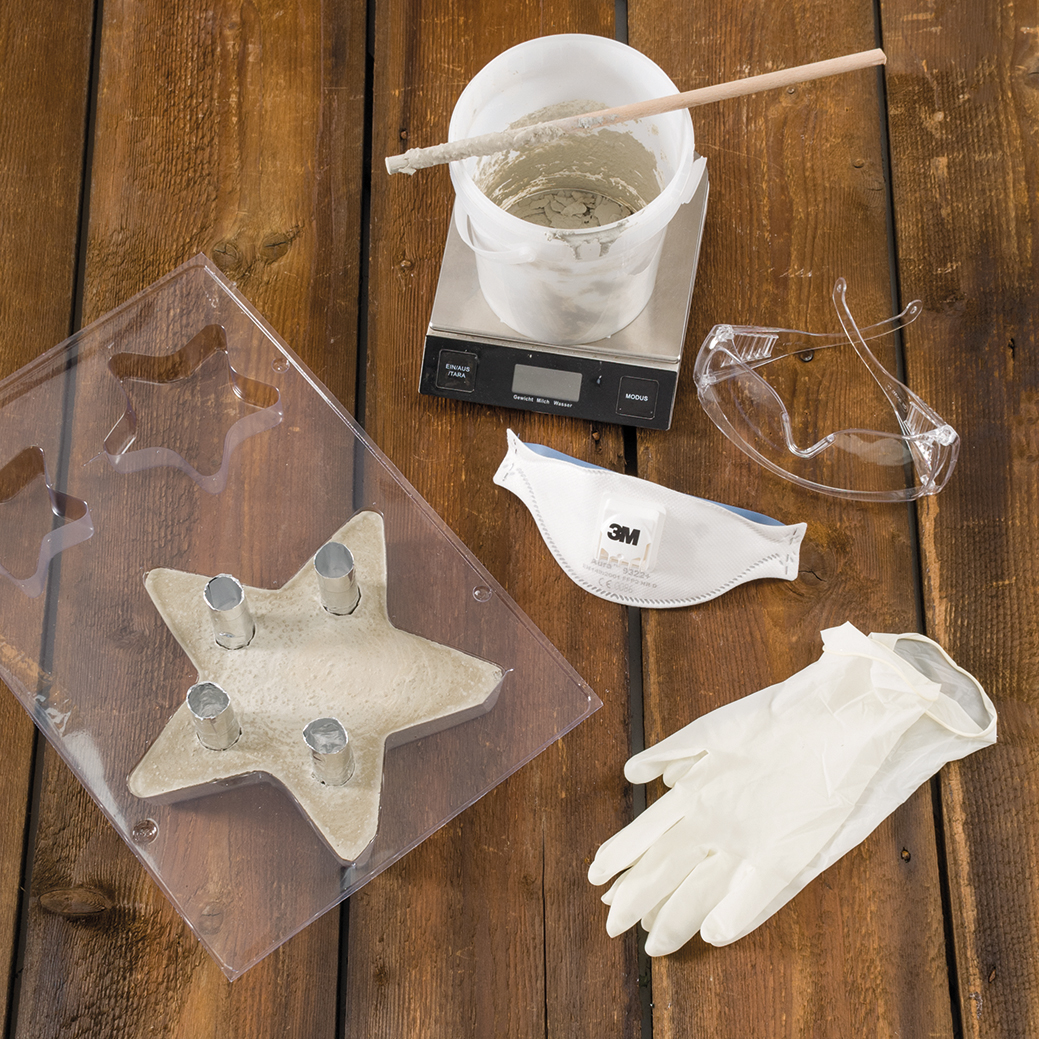
3. Mix about 900g of concrete powder with 126g of water in a mixing bowl and stir well for 3 minutes. Let the concrete rest for 2-3 minutes so that the air can escape. Then fill the big star mould with the concrete mass. Carefully put a forefinger in one of the foil candle sleeves and press it into the still soft concrete. Do the same with the other 3 aluminium foil sleeves.
The star can be removed from the mould after 24 hours. Remove the aluminium foil sleeves and insert the candles into the holes.
You will find Efco’s modelling and casting range of Beton and some of their moulds in the current Trends Autumn/Winter 2017 Catalogue. For more moulds check out the Technical Hobbies Catalogue.
Efcolor enamelling is lots of fun and much cheaper to do than traditional enamelling. Using resin based powders rather than ground glass you don’t need a kiln to fire your pieces. They can be heated in a conventional kitchen oven or better still on the purpose designed Efcolor Tealight Stove.

Because they are fired at such a low temperature (150ºC) you can enamel items other than copper e.g. ceramics, wood, aluminium, stone, glass, papier mâché. You can also combine other elements with them such as Swarovski crystals, rubs ons, rubber stamping, acrylic paints, even Distress crayons and embossing powders/crystals. You can create unique handmade jewellery and other items which make great presents for family and friends all year round but especially at Christmas. For instance this enamelled heart pendant is simple and easy to make but looks very luxurious…

Materials needed:
99 194 61 – Copper Heart Pendant 27 x 27 mm
93 717 06 – Efcolor Stove (or Domestic Oven)
93 700 29 – Dark Red Efcolor Powder
93 700 01 – White Efcolor Powder
93 703 91 – Silver Glitter Efcolor Powder
93 701 28 – Transparent Red Efcolor Powder
10 254 29 – Silver Lined Dark Red Indian Beads ø2.2mm
18 024 07 – Flat Nose Pliers
18 024 05 – Wire Cutters
In Addition:
Copper Tiger Tail Beading Wire
Copper Jump Ring and Clasp
Instructions:

1. Lightly sand the copper heart and cover with a layer of dark red Efcolor powder. Place the blank on the stove until the powder has melted creating a smooth glossy enamelled surface.
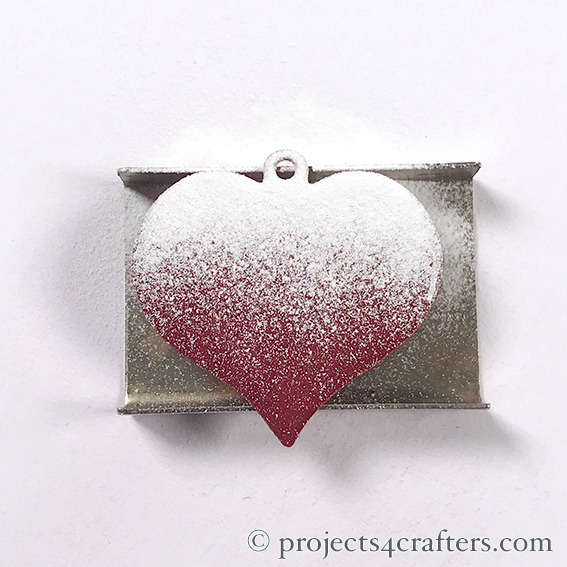
2. When cool, cover the top edges with white Efcolor, fading out as you move down the heart.

3. Before reheating the blank, cover the white Efcolor with a little silver glitter Efcolor, again focusing most across the top of the heart allowing it to thin out towards the bottom.

4. Place the blank back on the tealight stove until the powder has melted leaving you with a concentration of silver glitter at the top with hints of white fading out towards dark red at the bottom.

5. When cool, cover the blank with a thin layer of transparent red Efcolor and replace on the stove to melt the powder.

6. Take two lengths of beading wire and thread them with the dark red Indian beads. Attach the clasp at the ends and use a jump ring to attach the pendant when cool.
 |
Copyright © 2024. Efco creative emotions. All rights reserved |